|
Automated
Genotyping
I.
Tissue Lysis
II.
Generation of Robot Source Files with FileMaker
III.
Multiprobe II HT PCR Set Up
IV. Caliper
AMS 90 SE Electrophoresis
V. Materials
and Recipes
I. Tissue Lysis:
- Pre-warm the Eppendorf Thermomixer R MTP to 55°C.
- Add 250 µL 20 mg/mL Proteinase K to a 10 mL thawed aliquot of
2mmLB.
- Spin down the plate (use a balance plate) in the Eppendorf 5804
centrifuge for 30 seconds at maximum possible rpm.
- Using a multi-channel pipetor and sterile trough containing
the 2mmLB with Proteinase K. Transfer 100 µL of 2mmLB supplemented
with Proteinase K to each well of a Nunc 96-well plate containing
2mm tail biopsies or other tissue samples to be genotyped.
- Place the plate on the heating block for 1 minute uncovered
and without shaking to allow the lysis buffer to equilibrate to
the proper temperature.
- Seal the plate using a roller and new TemplateÒ Sealing Foil.
- Replace the heating block cover and heat at 55°C with shaking
at 1000 rpm for 4-6 hours. Check the samples every hour to ensure
the lysis is proceeding and that the plate is still properly sealed.
An unsealed plated can result in lysis buffer evaporation. Do
not lyse longer than 6 hours. If required, the Thermomixer R
can be programmed to change to 4°C without shaking for storage
for a few hours until the plate can be removed.
- Place the plate into the Thermocycler and run the Proteinase
K Inactivation Program before using lysates in PCR! After Proteinase
K inactivation, the plate can be stored frozen indefinitely until
thawed for the next step or keep it at 4°C or on ice for a few
hours.
II. Generation of Robot Source Files with FileMaker:
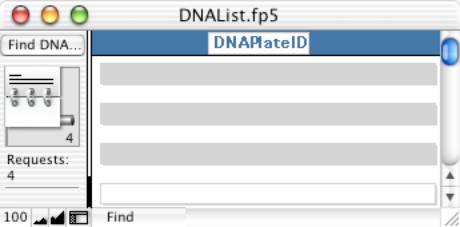
- Open the Genotyping FileMaker database consisting of the following
files: DNAList.fp5, MasterMix.fp5, Multiprobe.fp5, PCRList.fp5,
and PostMix.fp5. The DNAList.fp5 file will be brought to the
foreground.
- Import or enter into the DNAList.fp5 file the listing of DNA
sample records on 96-well plates with the following parameters
included for each sample: TagID, 96-well plate date ID, well column,
and well row. Each sample should also have each Genotype TBD
listed as needed (up to three). This list can be imported from
a comma or tab delimited text file. The database will enter the
PCR reactions required for each Genotype TBD by looking up the
PCR values specified for each GenotypeTBD from the PCRList.fp5
file. The database will also calculate the Multiprobe well number
for each sample from the column and row information. Creating
new records and entering the required info on the Add Samples
layout can also add DNA sample records.

- Run the Find DNA Plate Records script to find all records
that are to be processed. Up to four plates of DNA can be processed
at once on the Multiprobe II HT.
- Run the script: Generate Multiprobe Table. This script will
create a file of the reactions required. In English, the script
performs the following:
- Assigns a DNA Plate# to each 96-well plate
containing DNA samples.
- Deletes previous sample records from the Multiprobe.fp5
file.
- Goes through each found records PCR fields (1A-3B). If there
is a reaction specified, a record is added to the Multiprobe.fp5
file for each instance with DNA well number, PCR reaction required,
DNA TagID, DNA Plate#, and DNA Plate ID recorded for each PCR
reaction.
- Finds, sorts, and numbers the needed PCR reactions required
plus H2O in the MasterMix.fp5 file.
- Adds (-) controls for each PCR reaction required.
- Adds H2O wells to fill up the last used row of
the PCR plate (required for Caliper AMS 90 SE).
- Checks that the number of samples requires no more than four
PCR plates.
- Sorts by PCR required and TagID (ascending)
- Assigns PCR plate # (up to 4), well row, and well column numbers
arranged for Caliper AMS 90 SE processing in rows.
The resulting Multibrobe.fp5 file is a set of records for each
PCR reaction required for all the found DNA samples. In addition
to the field values entered by the script, the file also includes
a number of additional fields whose values are calculated based
on the information recorded for each record (well numbers, field
value counts, and MasterMix.fp5 lookups) or are constant for most
records.
- Run the script: Print Master Mix List. This will bring up
a dialog box for
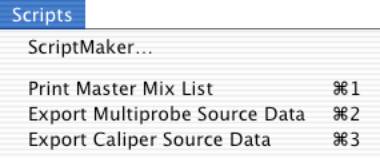 printing a listing of all
the PCR master mixes required for the current set of DNA samples
with the correct volumes calculated based on a count of each reaction
and the recipe information entered in MasterMix.fp5. printing a listing of all
the PCR master mixes required for the current set of DNA samples
with the correct volumes calculated based on a count of each reaction
and the recipe information entered in MasterMix.fp5.
- Run the script: Export Multiprobe Source Data. Follow the
directions in the message to export a listing of PCR reaction
records sorted by MasterMixVolume, (descending), PCRPlate (ascending),
PCRMultiprobeWell (ascending), and DNASource (descending) as comma-separated
values that the Multiprobe II software will access to set up the
PCR reactions.
- Run the script: Export Caliper Source Data. Follow the directions
in the message to export a listing of PCR reaction records sorted
by PCRPlate (ascending) and PCRCaliperWell (ascending) as comma-separated
values that can be imported into the Caliper AMS 90 SE software
as sample information. If you are setting up more than one PCR
plate you will have to run this script once for each plate.
III. Multiprobe II HT PCR Set Up:
-
Prepare the PCR Master Mixes as listed on the printout from step
5 of the previous section.
- Spin down the DNA plate(s) (use a balance plate) in the Eppendorf
5804 centrifuge for 5 minutes at maximum possible rpm.
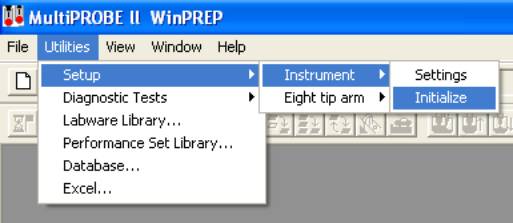
- Start the Multiprobe Winprep II software.
- Initialize the instrument.
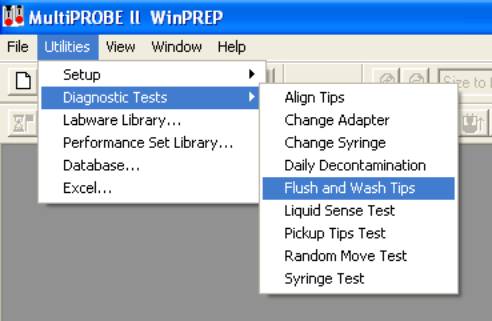
- Run Flush and Wash Tips utility until there are no more air
bubbles visible in the Multiprobe II HTs tubing.
-
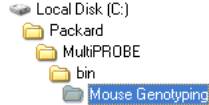
Open the MousePCR.MPT file located in the Mouse Genotyping Folder
in the path shown on the right.
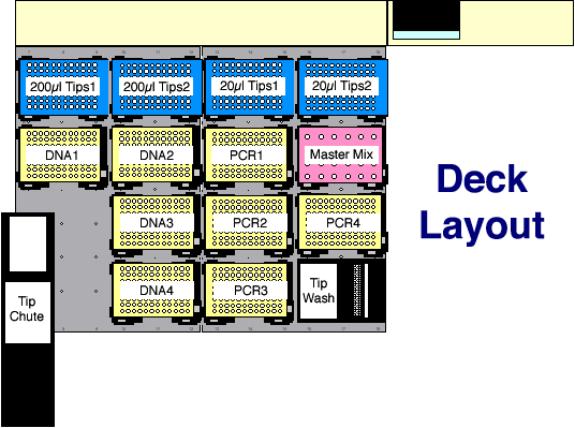
- Place the Nunc DNA plate(s) on the deck of the Multiprobe II
HT at the labware positions corresponding to DNA1, DNA2, DNA3,
DNA4 as listed in the PlateID List layout of the Multiprobe.fp5
file.
- Place new MJ Research Microseal 96-well plates on the deck of
the Multiprobe II HT at the labware positions corresponding to
PCR1, PCR2, PCR3, up to PCR4 as needed for the number of reactions
to be set up.
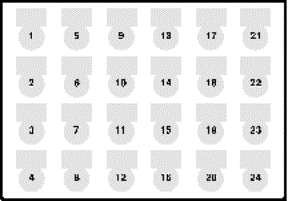
-
Load the master mix tubes onto the 1.5 mL adapter plate as listed
in the master mix printout. The well map appears on the right.
- Load tip boxes onto the back row of the deck as listed (two
boxes of 200 µL tips on the left and two boxes of 20 µL on the
right).
- Start the run by clicking on Execute.
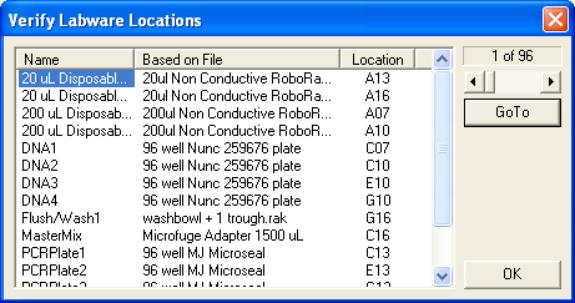
- An Initial User Query box will be displayed. Click on Verify Labware Locations to bring up the Verify
Labware Locations box.
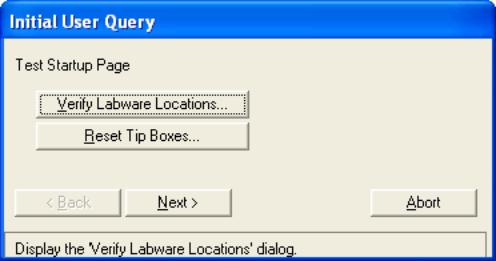
- Click on each labware name in turn and click on GoTo. The
robot arm should move to the specified labware item and lower
multiprobe tip #1 to the first well of the labwares well map.
Check to make sure that the tip lines up in the center of the
first well location. If it doesnt, it will be necessary to reevaluate
the labware (see Multiprobe II HT documentation for details on
how to define and evaluate labware). When all labware that will
be used has been checked, click on OK.
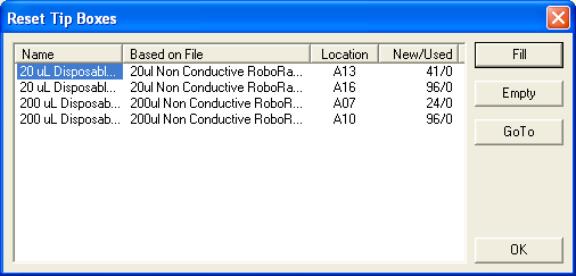
- Back at the Initial User Query box click on Reset Tip Boxes
to display a box for resetting tips. The numbers should match
up to what is actually present in each tip box. If they do not,
select the offending tip boxs name and click on Fill. This
will generate an error in finding tips later, during the run.
Then, during the run when the error occurs, it will be necessary
to repeatedly select Another Tip from the Tip Pickup Error
box until the robot is able to pickup up a full set of unused
tips. Click on OK when you are done resetting tips.
- Back at the Initial User Query Click on Next.
- A new Initial User Query box will appear that states please
browse for file. Click on
. Locate the .csv file of the PCR
created in step 6 of the Generate Robot Source Files section
of this document.
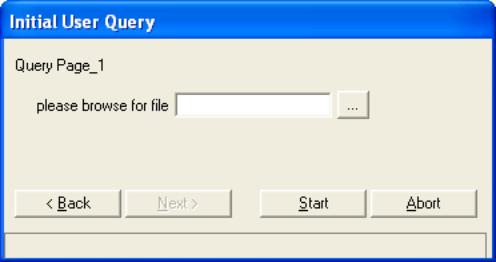
- When you have selected the correct file, click on Start, and
the Multiprobe II HT will start the pipetting steps.
- If you are setting up more PCR wells than there are tips present
on the rack, a prompt will show up when the required tips are
used up. Change the specified deck locations box with new tips
and click OK.
- Once all the PCR wells are prepared, top each PCR plate with
12-strip caps. Place in a 96-well plate alpha unit on an MJ Research
Thermocycler and run Program 58.
IV. Caliper AMS 90 SE Electrophoresis See HT
DNA 5000 SE 30 Reagent Kit Insert and Section V Required Materials
and Recipes!
V. Materials and Recipes:
- 200 µL Nunc 96-well plates (#259676) for tail biopsy lysis
- USA Scientific TemplateÒ Sealing Foil (#2923-0100) for sealing Nunc plates.
- MJ Research Microseal 96-well plate (MSP-9601) for PCR.
- MJ Research 12-Strip Caps (TCS-1201) for sealing Microseal plates
- 2mmLB (Nagy, A. 2003. Manipulating the Mouse Embryo: A Laboratory
Manual. Cold Spring Harbor Laboratory Press, Cold Spring Harbor,
NY).
|
|
50 |
mM KCl |
|
mL |
2 |
M KCl |
| |
1.5 |
mM MgCl2 |
0.75 |
mL |
2 |
M MgCl2 |
| |
10 |
mM Tris |
10 |
mL |
1 |
M Tris-HCl
pH8.3 |
| |
10mg |
Gelatin |
1 |
mL |
10 |
mg/mL Gelatin |
| |
0.045% |
NP40 |
.45 |
mL |
100 |
% NP-40 |
| |
0.045% |
Tween-20 |
.45 |
mL |
100 |
% Tween-20 |
| |
|
H2O |
945.25 |
mL |
|
H2O |
| |
|
|
1000 |
mL |
|
|
Autoclave in 4 X 250 mL bottles. Store
unopened bottles at room temperature. Otherwise keep 10 mL single
use aliquots per 15 mL tube at 20°C. 10 mL is enough for lysis
of a single full 96-well plate.
- 20 mg/mL Proteinase K
- Multiprobe II HT clear disposable 200 µl and 20 µl tips (one
of each for each PCR well).
- Proteinase K Inactivation program conditions
| 1 |
95°C |
10:00
minutes |
| 2 |
4°C |
forever |
| 3 |
End |
|
- Thermocycling program 58 conditions:
| 1 |
95°C |
5:00 minutes |
| 2 |
95°C |
0:45 seconds |
| 3 |
58°C |
0:30 seconds |
| 4 |
72°C |
0.4°/second |
| 5 |
72°C |
0:30 seconds |
| 6 |
Goto
2 |
39 times |
| 7 |
72°C |
10:00 minutes |
| 8 |
4°C |
forever |
| 9
|
End |
|
- Caliper AMS90 HT DNA 5000 SE 30 chip
- Caliper AMS90 HT DNA 5000 SE 30 reagents (#760124).
- 1X PCR Buffer Solution for Buffer Trough:
| |
4 |
mL |
25 mM MgCl2 |
| |
5 |
mL |
10X PCR Buffer |
| |
41 |
mL |
H2O |
| |
50 |
mL |
|
- HT DNA 5000 Ladder for Ladder Trough well A
| |
12 |
µL |
HT DNA
5000 |
| |
12 |
µL |
10XPCR
Buffer |
| |
9.6 |
µL |
25mM MgCl2 |
| |
86.4
|
µL |
H2O |
| |
120 |
µL |
|
- Chip Gel-Dye Mix:
- Transfer 1 mL of HT DNA 5000 SE 30 Gel Matrix (red cap)
and 25 µL of HT DNA 5000 SE Dye Concentrate (blue cap) to
a 1.5 mL microcentrifuge tube.
- Vortex the solution until it is well mixed. Transfer the
mixture to two spin filters (500 µL each).
- Centrifuge at RCF = 900 X G at room temperature for 10 minutes
or until Gel-Dye Mix has passed through the filter. Record
the date on the tube. Store in the dark at 4°C. Use within
3 weeks.
- Caliper Chip Storage Buffer (0.2µm filtered)
| |
200 mM TAPS |
| |
2 mM EDTA pH 8.0 |
|
|